

How To Detach Mobile Operations Center
Linux Windows
Compute Engine provides graphics processing units (GPUs) that you tin add to your virtual machine instances (VMs). You can utilise these GPUs to accelerate specific workloads on your VMs such as machine learning and data processing.
If you did non attach GPUs during VM creation, you can add GPUs to your existing VMs to suit your application needs as they arise.
If you attached GPUs during or after VM creation, yous can detach these GPUs from these VMs when you no longer need them.
Overview
In summary, the procedure to add or remove a GPU from an existing VM is as follows:
- Check that your VM has a boot disk size of at least twoscore GB.
- Set your VM for the modification.
- Cease the VM.
- Add or remove the GPU.
-
If you are calculation a GPU, y'all need to consummate the following steps:
- Modify the host maintenance setting for the VM. VMs with GPUs cannot live migrate considering they are assigned to specific hardware devices. For more data, see GPU restrictions.
- Change the motorcar type. GPUs are only supported on select auto types.
- Install a GPU driver on your VM, so that your system tin can employ the device.
Earlier you begin
- If you want to employ the command-line examples in this guide, exercise the following:
- Install or update to the latest version of the Google Deject CLI.
- Set a default region and zone.
- If you want to utilize the API examples in this guide, prepare upward API admission.
- Read nearly GPU pricing on Compute Engine to understand the cost to employ GPUs on your VMs.
- Read about restrictions for VMs with GPUs.
- Check your GPU quota.
Checking GPU quota
To protect Compute Engine systems and users, new projects accept a global GPU quota, which limits the full number of GPUs you can create in any supported zone.
Utilize the regions describe command to ensure that yous accept sufficient GPU quota in the region where you want to create VMs with GPUs.
gcloud compute regions describe REGION
Supervene upon REGION with the region that you want to check for GPU quota.
If you need boosted GPU quota, asking a quota increase. When y'all request a GPU quota, y'all must asking a quota for the GPU types that you want to create in each region and an additional global quota for the total number of GPUs of all types in all zones.
If your project has an established billing history, it will receive quota automatically after you submit the request.
Preparing your VM
When a GPU is added to a VM, the order of the network interface can change.
Well-nigh public images on Compute Engine do not have persistent network interface names and adapt to the new club.
However, if you are using either SLES or a custom image, yous must update the arrangement setting to forbid the network interface from persisting. To prevent the network interface from persisting, run the following command on your VM:
rm /etc/udev/rules.d/70-persistent-cyberspace.rules
Modifying the GPU count for existing A2 VMs
This section covers how to increment or decrease your A100 GPU count by switching between A2 machine types.
If you are using an A2 motorcar and no longer require GPUs, you need to change your machine from A2 to another auto type. For more information, see Changing the machine blazon of a VM instance.
Limitations (A100)
-
a2-megagpu-16gautomobile types are not supported on Windows operating system. When using Windows operating systems, choose a different machine blazon. For a listing of machine types, see NVIDIA® A100 GPUs. - For Windows VMs that apply A2 machine types, you cannot practise a quick format of the fastened local SSDs. To format these local SSDs, yous must practice a full format by using the diskpart utility and specifying
format fs=ntfs characterization=tmpfs. -
You can't modify the A2 ultra (A100 80GB) machine series. Meet A2 limitations.
Console
You lot can add GPUs to your VM past stopping the VM and editing the VM configuration.
-
Verify that all of your disquisitional applications are stopped on the VM.
-
In the Google Deject console, become to the VM instances folio to see your list of VMs.
Go to VM instances
-
Click the name of the VM where you want to add GPUs. The VM details page opens.
-
On the VM details folio, complete the following steps:
- Click Finish to stop the VM. You lot can check the notification panel to come across when the instance is stopped.
- On the stopped VM, click Edit to modify the VM properties.
-
In the Machine configuration section, select the GPU machine family unit, and then practice the following:
-
Modify the GPU type drop-down. Run into A2 limitations.
-
In the Number of GPUs listing, increase or decrease the GPU count.
-
-
Click Save to apply your changes.
-
Click Start/Resume to restart the VM.
API
You can add together GPUs to your VM by stopping the VM and changing your VM's configuration.
-
Verify that all of your critical applications are stopped on the VM, and so create a Mail service command to stop the VM and so it can move to a host system where GPUs are available.
POST https://compute.googleapis.com/compute/v1/projects/PROJECT_ID/zones/ZONE/instances/VM_NAME/stop
Supplant the following:
-
PROJECT_ID: projection ID. -
VM_NAME: the name of the VM to stop. This is the VM that you desire to adhere GPUs to. -
ZONE: the zone where the VM is located. This zone must back up A100 GPUs.
-
-
After the VM stops, create a POST request to change the car type.
Postal service https://compute.googleapis.com/compute/v1/projects/PROJECT_ID/zones/ZONE/instances/VM_NAME/setMachineType { machineType: "zones/us-central1-f/machineTypes/MACHINE_TYPE" }Supplant the following:
-
PROJECT_ID: your project ID. -
ZONE: the zone for the VM. -
VM_NAME: the name of the VM. -
MACHINE_TYPE: a A2 machine type. See A2 limitations.
-
-
Create a Mail service command to set the scheduling options for the VM.
POST https://compute.googleapis.com/compute/v1/projects/PROJECT_ID/zones/ZONE/instances/VM_NAME/setScheduling { "onHostMaintenance": "Finish", "automaticRestart": true }Replace the following:
-
PROJECT_ID: project ID. -
VM_NAME: the name of the VM where you desire to add together GPUs. -
ZONE: the zone where the VM is located.
-
-
Start the VM.
Post https://compute.googleapis.com/compute/v1/projects/PROJECT_ID/zones/ZONE/instances/VM_NAME/start
Replace the following:
-
PROJECT_ID: project ID. -
VM_NAME: the name of the VM that you desire to add GPUs to. -
ZONE: the zone where the VM is located.
-
Adding GPUs to existing VMs
This department covers how to add together the post-obit GPU types to existing VMs.
NVIDIA GPUs:
- NVIDIA T4:
nvidia-tesla-t4 - NVIDIA P4:
nvidia-tesla-p4 - NVIDIA P100:
nvidia-tesla-p100 - NVIDIA V100:
nvidia-tesla-v100 - NVIDIA K80:
nvidia-tesla-k80
NVIDIA RTX (formerly known as NVIDIA GRID) virtual workstation GPUs:
- NVIDIA T4 Virtual Workstation:
nvidia-tesla-t4-vws - NVIDIA P4 Virtual Workstation:
nvidia-tesla-p4-vws -
NVIDIA P100 Virtual Workstation:
nvidia-tesla-p100-vwsFor these virtual workstations, an NVIDIA RTX Virtual Workstation license is automatically added to your VM.
Console
You tin add together or remove GPUs from your VM by stopping the VM and editing the VM configuration.
-
Verify that all of your critical applications are stopped on the VM.
-
In the Google Deject console, go to the VM instances page to see your list of VMs.
Go to VM instances
-
Click the name of the VM where yous want to add together GPUs. The VM case details folio opens.
-
Complete the following steps from the VM instance details page.
-
Click Stop to stop the VM. You lot can check the notification panel to see when the example is stopped.
-
On the stopped VM, click Edit and consummate the following steps:
-
From the Automobile configuration section, complete the following steps.
- Under Series, select N1.
- Under Motorcar type, select the N1 machine type that yous want.
- Expand the CPU platform and GPU section.
- Click Add GPU.
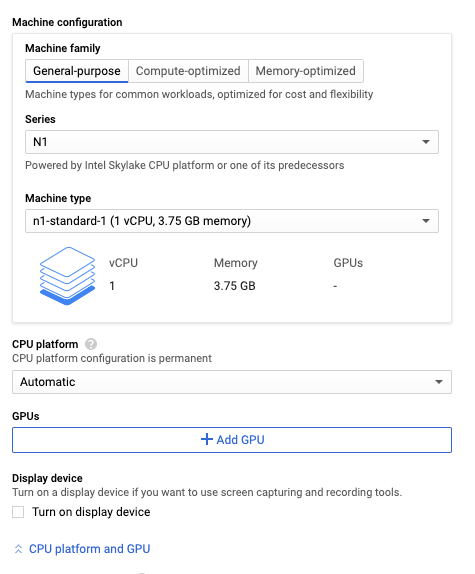
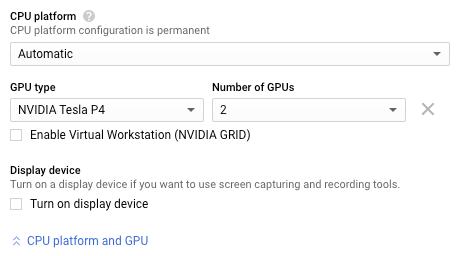
- Specify the GPU type and Number of GPUs.
-
If your GPU model supports virtual workstations, and you plan on running graphics-intensive workloads on this VM, select Enable Virtual Workstation (NVIDIA GRID).
For information near NVIDIA RTX virtual workstations, see NVIDIA RTX virtual workstations for graphics workloads (formerly known as NVIDIA GRID).
-
Scroll to the On host maintenance section. When you add GPUs to a VM, the host maintenance setting is automatically set to Terminate VM instance. See Handling GPU host maintenance events.
-
Click Relieve to apply your changes.
-
Click Start/Resume to restart the VM.
-
API
Yous tin can add GPUs to your VM by stopping the VM and changing your VM's configuration through the API.
-
Verify that all of your critical applications are stopped on the VM and so create a POST command to stop the VM so information technology can move to a host system where GPUs are available.
POST https://compute.googleapis.com/compute/v1/projects/PROJECT_ID/zones/ZONE/instances/VM_NAME/end
Replace the following:
-
PROJECT_ID: projection ID. -
VM_NAME: the name of the VM to stop. This is the VM that you lot want to attach GPUs to. -
ZONE: the zone for where the VM is located.
-
-
Identify the GPU type that you want to add together to your VM. Submit a Go request to list the GPU types that are available to your projection in a specific zone.
GET https://compute.googleapis.com/compute/v1/projects/PROJECT_ID/zones/ZONE/acceleratorTypes
Supercede the following:
-
PROJECT_ID: projection ID. -
ZONE: the zone where you want to list the bachelor GPU types.
-
-
If the VM has a shared-core machine type, you must modify the machine type to accept one or more vCPUs. You cannot add accelerators to VMs with shared-core machine types.
-
After the VM stops, create a Postal service request to add 1 or more GPUs to your VM.
Postal service https://compute.googleapis.com/compute/v1/projects/PROJECT_ID/zones/ZONE/instances/VM_NAME/setMachineResources { "guestAccelerators": [ { "acceleratorCount": ACCELERATOR_COUNT, "acceleratorType": "https://world wide web.googleapis.com/compute/v1/projects/PROJECT_ID/zones/ZONE/acceleratorTypes/ACCELERATOR_TYPE" } ] }Replace the following:
-
VM_NAME: the proper noun of the VM. -
PROJECT_ID: your project ID. -
ZONE: the zone for the VM. -
ACCELERATOR_COUNT: the number of GPUs that you desire to adhere to your VM. For a list of GPU limits based on the machine blazon of your VM, see GPUs on Compute Engine. -
ACCELERATOR_TYPE: the GPU model that you want to use. If y'all plan on running graphics-intensive workloads on this VM, use one of the virtual workstation models.Choose one of the following values:
-
NVIDIA GPUs:
- NVIDIA T4:
nvidia-tesla-t4 - NVIDIA P4:
nvidia-tesla-p4 - NVIDIA P100:
nvidia-tesla-p100 - NVIDIA V100:
nvidia-tesla-v100 - NVIDIA K80:
nvidia-tesla-k80
- NVIDIA T4:
-
NVIDIA RTX (formerly known equally NVIDIA GRID) virtual workstation GPUs:
- NVIDIA T4 Virtual Workstation:
nvidia-tesla-t4-vws - NVIDIA P4 Virtual Workstation:
nvidia-tesla-p4-vws - NVIDIA P100 Virtual Workstation:
nvidia-tesla-p100-vws
For these virtual workstations, an NVIDIA RTX Virtual Workstation license is automatically added to your VM.
- NVIDIA T4 Virtual Workstation:
-
-
-
Create a POST command to prepare the scheduling options for the VM.
Mail service https://compute.googleapis.com/compute/v1/projects/PROJECT_ID/zones/ZONE/instances/VM_NAME/setScheduling { "onHostMaintenance": "TERMINATE", "automaticRestart": true }Supercede the following:
-
PROJECT_ID: project ID. -
VM_NAME: the proper name of the VM where you desire to add GPUs. -
ZONE: the zone where the VM is located.
-
-
Start the VM.
Mail https://compute.googleapis.com/compute/v1/projects/PROJECT_ID/zones/ZONE/instances/VM_NAME/start
Supplant the following:
-
PROJECT_ID: project ID. -
VM_NAME: the name of the VM that you desire to add GPUs to. -
ZONE: the zone where the VM is located.
-
Next: To ensure that your organisation tin use the GPUs, complete the following steps:
- Install the GPU drivers.
- If you lot enabled NVIDIA RTX virtual workstation, install a driver for the virtual workstation.
Removing or modifying GPUs
This department covers how to remove the following GPU types from an existing VM.
NVIDIA GPUs:
- NVIDIA T4:
nvidia-tesla-t4 - NVIDIA P4:
nvidia-tesla-p4 - NVIDIA P100:
nvidia-tesla-p100 - NVIDIA V100:
nvidia-tesla-v100 - NVIDIA K80:
nvidia-tesla-k80
NVIDIA RTX (formerly known every bit NVIDIA Grid) virtual workstation GPUs:
- NVIDIA T4 Virtual Workstation:
nvidia-tesla-t4-vws - NVIDIA P4 Virtual Workstation:
nvidia-tesla-p4-vws -
NVIDIA P100 Virtual Workstation:
nvidia-tesla-p100-vwsFor these virtual workstations, an NVIDIA RTX Virtual Workstation license is automatically added to your VM.
You can use the Google Cloud console to remove GPUs from an existing VM, or alter the number or type of GPU that y'all have attached. To remove or modify GPUs, consummate the following steps:
-
Verify that all of your critical applications are stopped on the VM.
-
In the Google Cloud console, go to the VM instances folio to run into your list of VMs.
Get to VM instances
-
Click the proper noun of the VM where you desire to remove or modify GPUs. The VM details folio opens.
-
Complete the following steps from the VM details folio.
- Click Finish to stop the VM. You can bank check the notification panel to see when the instance is stopped.
- On the stopped VM, click Edit.
- Under Machine configuration, aggrandize the GPU section.
- Remove or modify the GPUs equally follows:
- To modify the GPUs, adjust the Number of GPUs or the GPU type every bit needed.
- To remove all GPUs, click Delete GPU.
- Optional: Change the VM host maintenance policy setting. When y'all add GPUs to a VM, the host maintenance setting is automatically set to Cease VM instance. With no GPUs fastened, you now take the selection to live drift during host maintenance. For more information about setting VM host maintenance policy, see Fix VM host maintenance policy.
- Click Save to apply your changes.
- Click Start/Resume to restart the VM.
What'southward next?
- Learn more than about GPU platforms.
- Add together Local SSDs to your instances. Local SSD devices pair well with GPUs when your apps crave high-functioning storage.
- Create groups of GPU instances using instance templates.
- To monitor GPU operation, see Monitoring GPU performance.
- To optimize GPU performance, meet Optimizing GPU performance.
- To handle GPU host maintenance, come across Handling GPU host events.
- Attempt the Running TensorFlow Inference Workloads at Scale with TensorRT5 and NVIDIA T4 GPU tutorial.
Source: https://cloud.google.com/compute/docs/gpus/add-remove-gpus
0 Response to "How To Detach Mobile Operations Center"
Post a Comment